Custom AnyDesk Client Security - Security Step
The Security step of the my.anydesk.com Custom Client Generator is the most important one in the wizard: here you define who can request a connection, who can connect and with which permissions. A bad configuration here leaves machines exposed or unreachable.
This guide explains every option in the Security step, what it does and when to use it.
Video tutorial
This step explained on video:
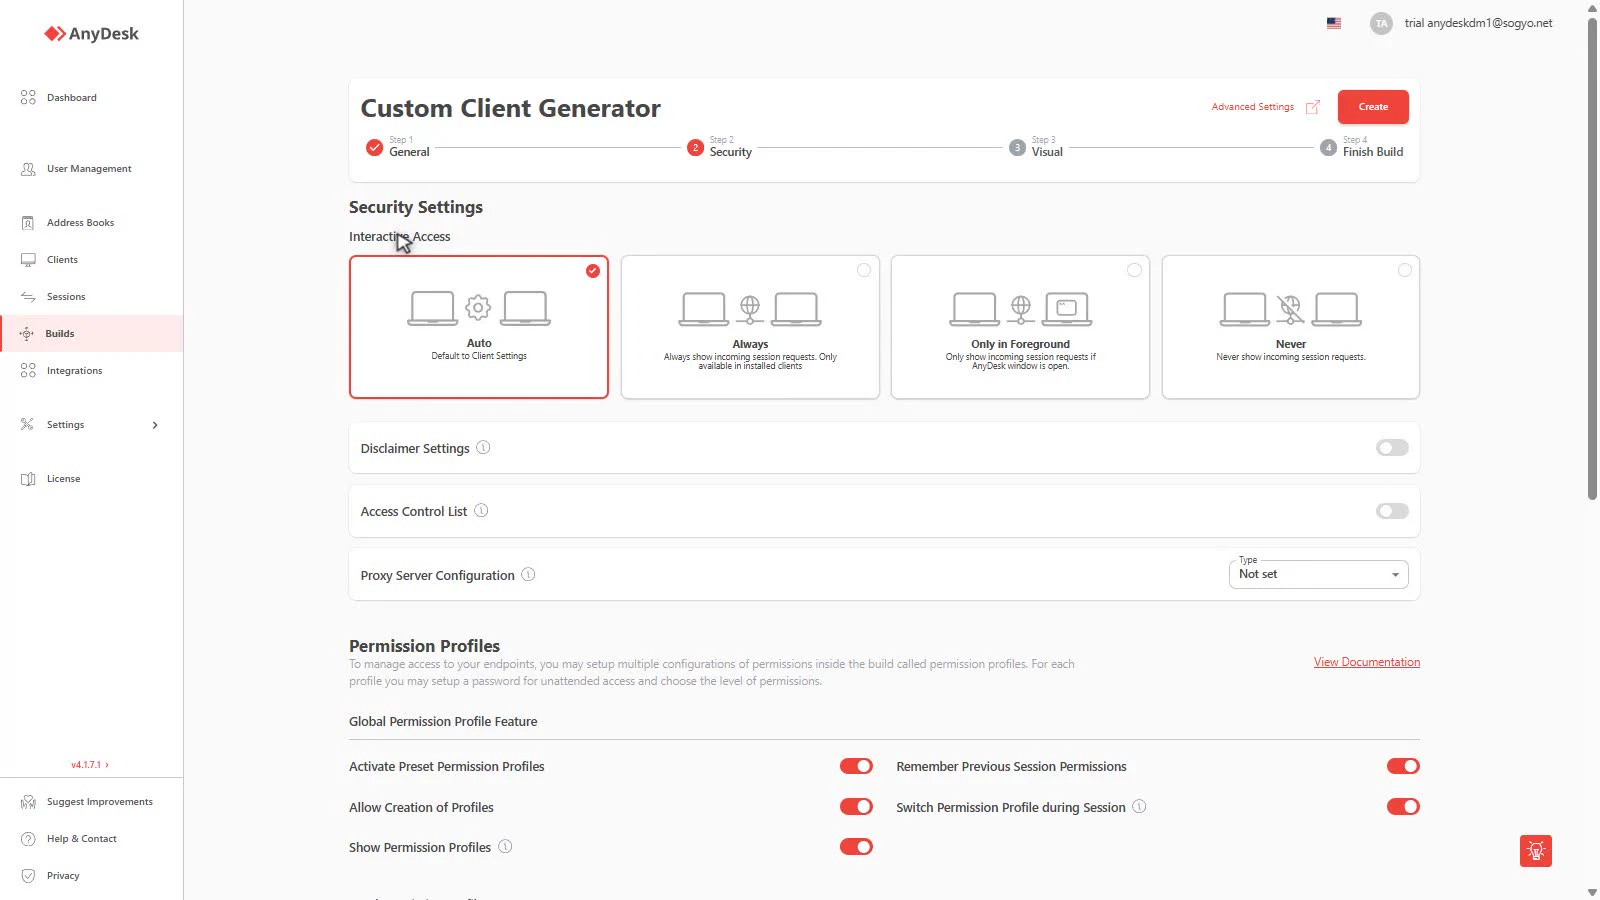
Interactive Access
What it does: defines when the user sees the incoming connection request window. The console shows four options:
- Auto — Default to Client Settings: inherits whatever the installed client’s settings say. The most flexible option if you don’t want to decide now.
- Always — the permission window appears whenever someone requests a connection to the ID, even with AnyDesk running in the background. Only available in installed clients.
- Only in Foreground — only if the user has the AnyDesk window open. The technician will have to notify them first (Teams, phone, Slack) so they open the app.
- Never — never shows a request: unattended access with password only. The user just gets a notification that the session happened.

Real use case: for employees assisted by the helpdesk, Always gives the best experience. Never is the choice for servers, digital signage or machinery without an operator — the technician gets in with a password without interrupting anyone.
Disclaimer Settings
What it does: when enabled, the client shows a legal text/disclaimer the first time the application is opened.
Real use case: a compliance requirement — “By using this software you accept the company’s remote support policy”. It also works for showing first-use instructions to the end user.
Access Control List
What it does: a whitelist of AnyDesk IDs or aliases authorized to connect to this client. If the request doesn’t come from an ID on the list, it’s automatically rejected.
Real use case: on the accounting department’s machine you register only your support agents’ IDs — any other connection attempt, internal or external, never gets established. In medium or large networks, manage these lists with the Namespace add-on, which makes it easy to keep IDs organized by domain.
Proxy Server Configuration
What it does: defines how the client reaches the AnyDesk network:
- Not set / Disabled — direct connection.
- Detect Proxy — detects the system configuration.
- Custom — manually configured proxy.
Real use case: on corporate networks with a mandatory proxy, Detect Proxy is usually enough; Custom for proxies with authentication or specific routes.

Permission Profiles
Permission Profiles let you define several access levels within the same build — each with its own password and permission set. It’s the answer to “I want a junior to see the screen but only a senior to control the keyboard”.
Global Permission Profile Feature
Toggles that apply to all profiles:
| Option | What it controls | When to use |
|---|---|---|
| Activate Preset Permission Profiles | Enables the predefined profiles | Almost always — it’s the base of the system |
| Remember Previous Session Permissions | Remembers the last profile used on the device | To avoid reconfiguring on every recurring session |
| Allow Creation of Profiles | The user can create their own profiles | Only if you want the end user managing access — on controlled clients, disable it |
| Switch Permission Profile during Session | Switch profiles mid-session | Useful: start on Screen Sharing and escalate to Full Access without dropping |
| Show Permission Profiles | Shows the profiles in the client | If profiles should be visible/selectable by the user |

Local Permission Profile Features
Four predefined tabs — Default, Screen Sharing, Full Access, Unattended Access — plus Add Profile for custom profiles. Per profile you can adjust:
- Permission Profile Enabled — enables or disables that profile in the build.
- Show in Accept Window — the user can pick it when accepting the connection.
- Profile Switching — allows switching to that profile during the session.
- Unattended Access — the unattended password tied to that profile (Not set if not applicable).

Customize Permissions
The granular permission list per profile: sound, clipboard, keyboard and mouse, file transfer, restart, Privacy Mode, Ctrl+Alt+Del, drawing on screen, system information, etc.
Real use case: you configure Screen Sharing with everything off except “view screen” — the junior auditor watches without being able to touch anything. Full Access stays for admins only, with their own password.

Advanced Settings
The Advanced Settings button (top right, next to Create) opens the key-value pair editor for settings with no UI:
- Overwrites — forces a setting the user cannot change from the client. For security features, always Overwrite.
- Defaults — changes the default value; the user can still modify it.
Real use case: ad.ui.cfg_version=..., disabling the address book by key, forcing video quality — the full key list is in the “Custom client advanced options” documentation. It’s the path for everything the wizard doesn’t expose.
Next step
With security defined, click Next for the Visual step: logo, colors, frame and client appearance. And if you haven’t reviewed the previous step yet, read Create a Custom Client - General Step.
Need AnyDesk licenses for your team? Sogyo is an official AnyDesk wholesale distributor in Latin America — we help you choose the right plan and deploy custom clients at scale.
MyAnyDesk in detail series
This guide is part of the series on the my.anydesk.com Custom Client Generator:
Click to continue reading
- Published at