Enhancing Cybersecurity: A User-Free Security Philosophy for Preventing Social Engineering Attacks
Security Philosophy: Removing User Decision-Making
The cornerstone of this strategy is to relieve employees of the burden of security. In modern cybersecurity, it is well understood that “human error” is the most common attack vector. Social engineering (deception) thrives because it exploits users’ willingness to help, urgency, or fear.
Why is This Approach Essential?
- Users Aren’t Experts: There’s an assumption that finance or human resources employees can technically discern between a legitimate connection window and an illegitimate one, especially under pressure.
- Decision Fatigue: Faced with multiple alerts or an urgent and aggressive call from someone claiming to be “technical support,” users often yield to resolve the issue quickly.
- Technical Block vs. Human Block: If we rely on users to say “No,” there’s a margin for error. By configuring the software to not allow them to say “Yes” (even if they want to), we eliminate risk.
By implementing the measures outlined in this guide, we shift from reactive security (waiting for users to spot the scam) to preventive security (the system automatically rejects the scam without human intervention).
Protection Against Social Engineering and Unauthorized Access
This guide details advanced technical configuration for corporate environments utilizing the Standard license (and the Namespace add-on), with the aim of preventing external attackers from tricking employees into granting remote access.
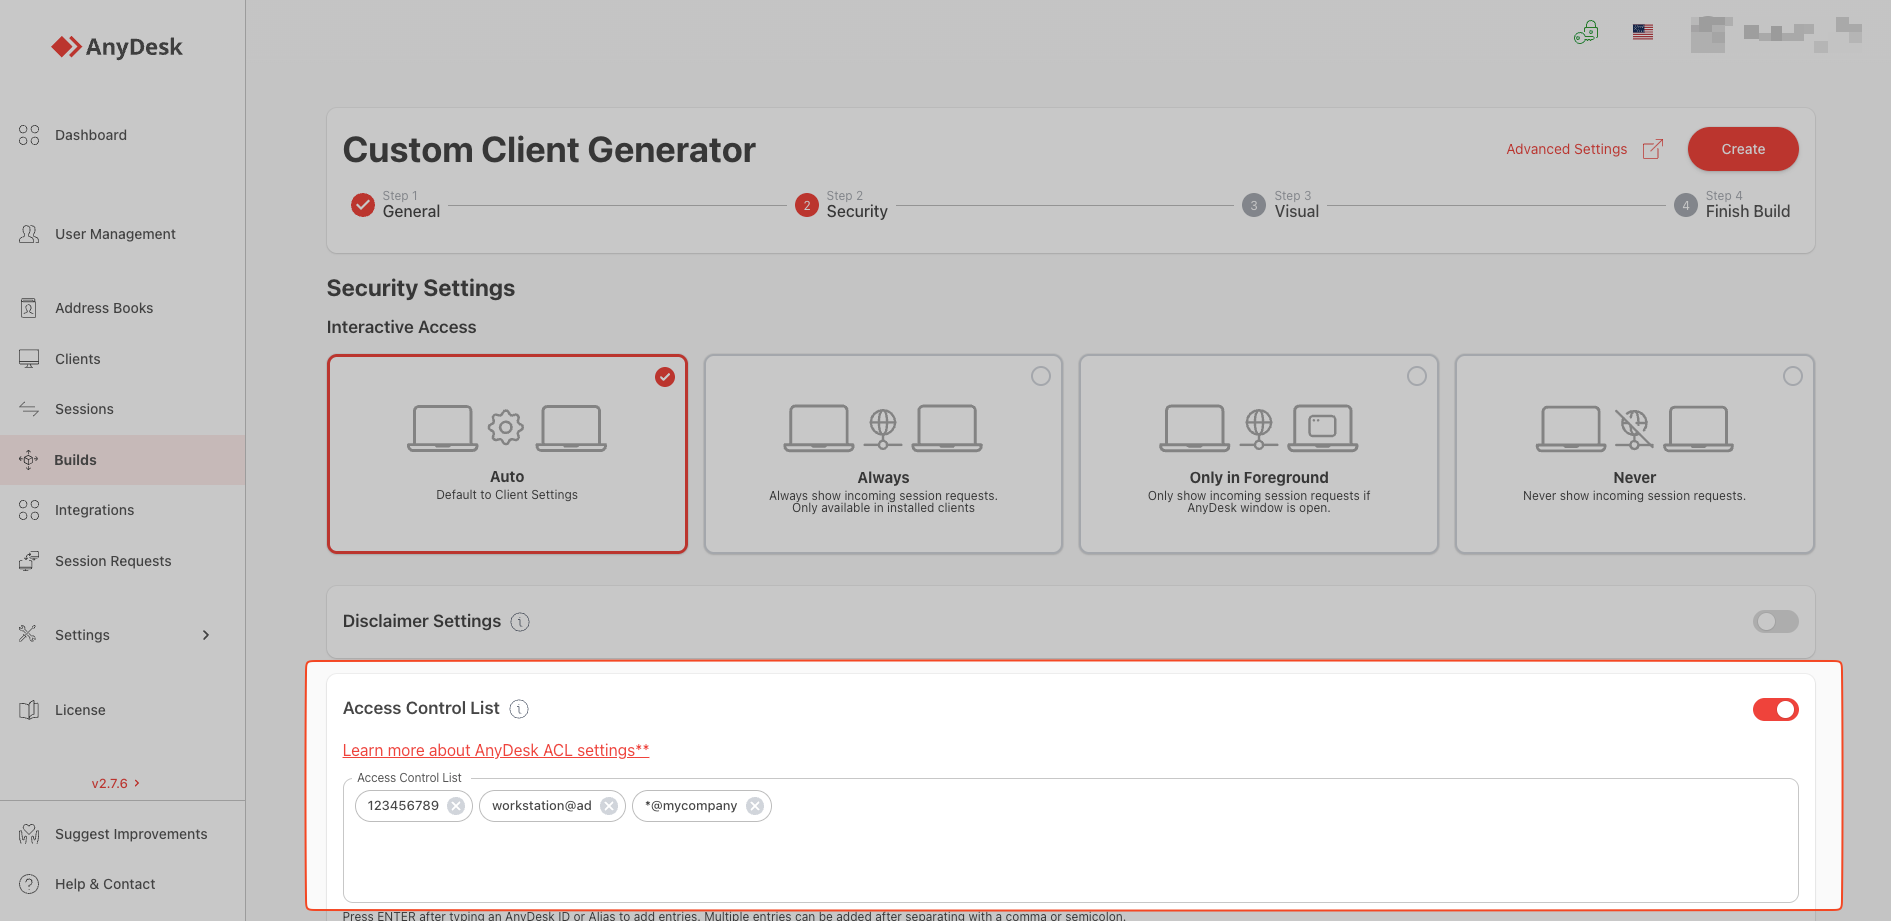
1. In-Depth Look at Access Control Lists (ACL)
The ACL is the most critical barrier. It operates under the principle of “Deny everything by default.” If the list is empty, AnyDesk allows connections from anyone (with confirmation). If there is even a single entry on the list, AnyDesk automatically blocks any connection that doesn’t match that entry.
Syntax and Configuration Strategy
Instead of adding individual numerical IDs (which can be difficult to maintain due to IT staff rotation), it’s recommended to use Wildcards if you possess a Namespace, or specific IDs if not.
A. Filtering by Numerical ID (Basic)
If your technicians use generic AnyDesk or you don’t have your own Namespace.
- Format: 123456789 (One ID per line).
- Advantage: Granular control.
- Disadvantage: You must update the client for all employees if you hire a new technician.
B. Filtering by Namespace and Wildcards (Advanced)
If your organization has acquired the Namespace add-on (e.g., @yourcompany).
- Format: *@yourcompany
- Functionality: The asterisk acts as a wildcard. This allows any technician whose username ends with @yourcompany to connect while instantly blocking:
- Any user @ad (the free/public version).
- Any user from another company.
- Any attacker using stolen accounts from other domains.
Location in Configuration
For local testing before deployment:
- Go to Settings > Security.
- Unlock the security lock (admin privileges required).
- Navigate to Access Control List section.
- Enable Restrict access to the following IDs and aliases.
- Enter the patterns (e.g., *@yourcompany or the IDs).
2. Custom Client Configuration
Do not allow employees to install the public AnyDesk. You should generate a MSI/EXE executable from my.anydesk.com that contains the “embedded” security rules.
Critical Steps in the Generator (my.AnyDesk):
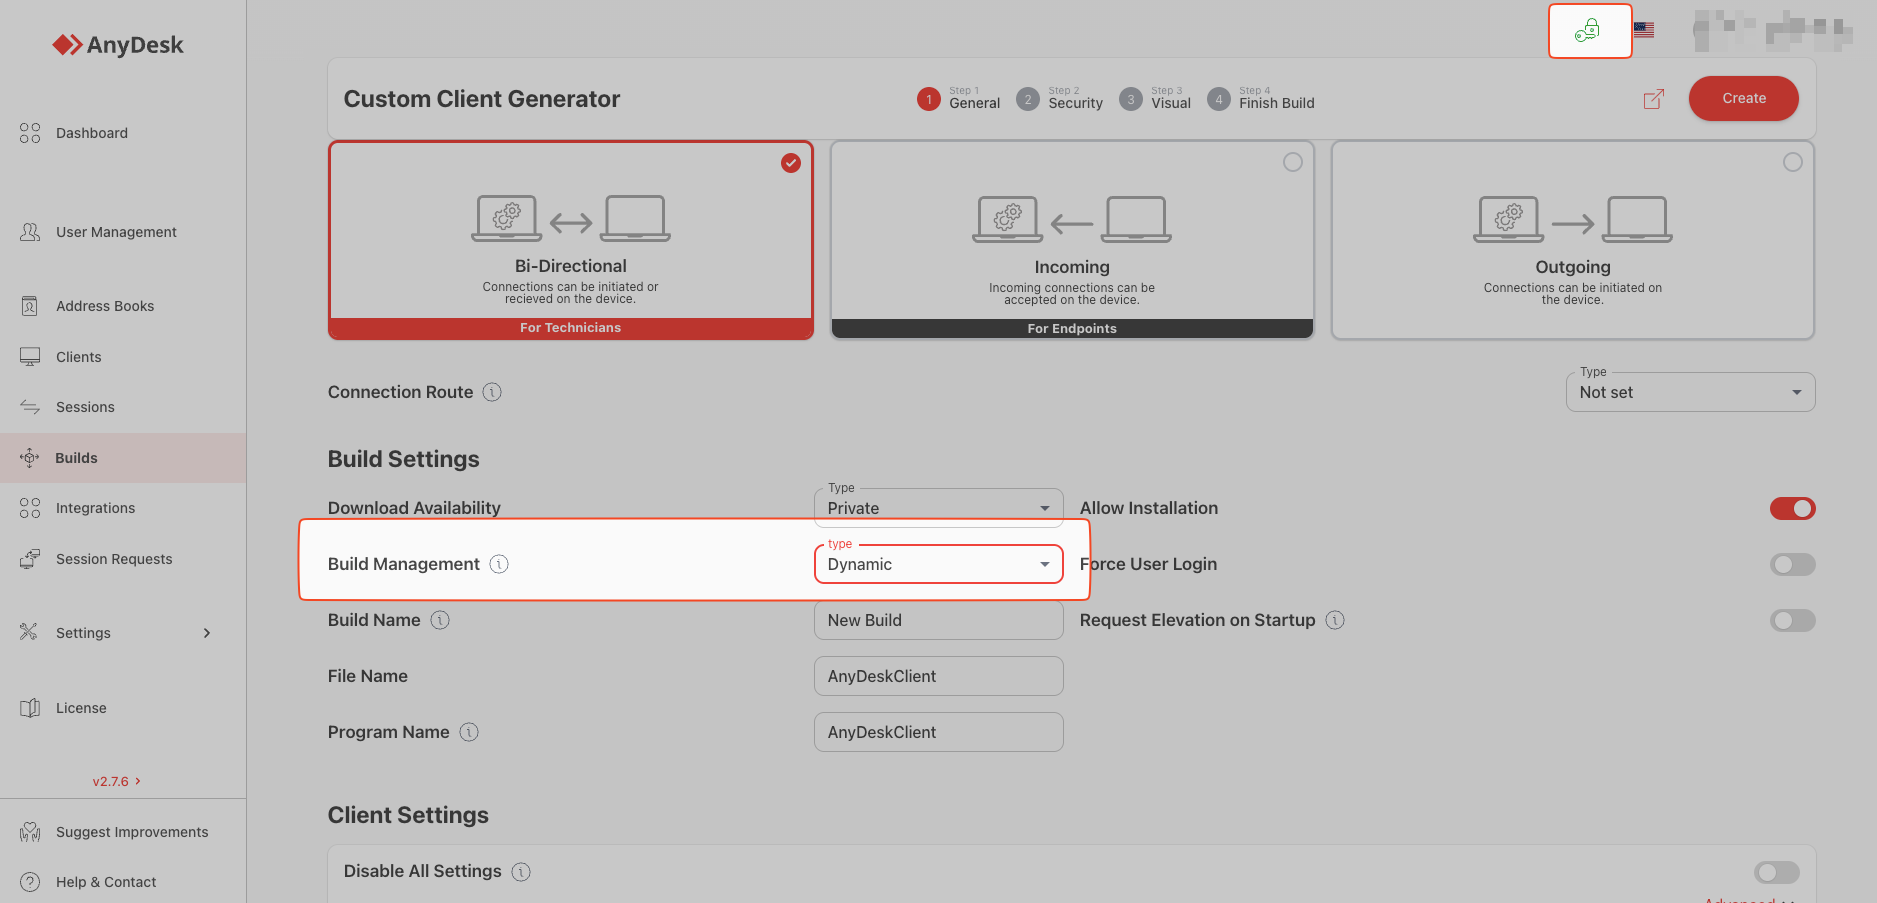
When creating a new client in the Clients tab, set the following:
A. “Options” Section
- Disable Settings: RADICAL. This option is usually unnecessary if the company manages user privileges effectively (keeping administrators and regular users separate), but if you want remote access to remain secure even in the event of a misuse of an admin account, you should check this box. This removes the settings tab from the user menu.
- Why: It prevents an attacker from bypassing security through social engineering (e.g., “Please go to settings and delete the list so I can help you”).
- Request Elevation at Startup: Recommended to enable. This option prompts for elevation of privileges (UAC) at startup, preventing Windows from blocking the technician when performing administrative tasks. Important: This only applies to portable versions or those that don’t require installation since AnyDesk installation requires administrator privileges.
B. “Security” Section
- Access Control List (ACL): This is where we “burn” the whitelist into the installer.
- Enter your technicians’ IDs or the wildcard *@yourcompany here.
- Once this client is installed on the employee’s PC, the list will be active and blocked.
- Interactive Access: Keep this set to “Always Show Incoming Session Requests.” Never allow unmonitored access unless it is for a server.
C. “Program Name & Icon” Section
- Upload your company logo.
- Change the name from “AnyDesk” to “Remote Support [YourCompany].”
- Psychological Effect: Train users to recognize, “If the program does not have our company’s blue logo, it’s a virus/scam.”
2.1. Advanced Management: Dynamic Clients
There is an operational limitation with traditional (Static) custom clients: the configuration is “burned” into the .exe or .msi file at the time of download. If you need to change the access list (ACL) because a technician has left or you changed a security policy, you must generate a new installer and redeploy it across the company, which is costly and slow.
To resolve this, AnyDesk (version 8.0.3 or higher) offers Dynamic Client Configuration.
What Are They and How Do They Work?
Unlike the static client, the dynamic client does not have the configuration permanently embedded. Instead, the installed client periodically queries AnyDesk servers (my.anydesk.com) to download its latest configuration.
Critical Advantages (Zero Redeployment)
- Real-Time ACL Updates:
- Scenario: You terminate a technician with critical access or discover an ID has been compromised.
- Solution: You go to the web console, remove that ID from the ACL profile, and save it.
- Result: Automatically, all company computers update their lists and block the technician. You don’t need to touch users’ PCs or send updates via GPO.
- Policy Flexibility:
- You can strengthen security on the fly (e.g., disable the clipboard globally in response to data leakage threats) without needing to reinstall the software.
- Ease of Management:
- You maintain a “single source of truth” in the cloud. You can be sure that all clients have the same security configuration regardless of when they were installed.
How to Implement Dynamic Clients
- In my.anydesk.com, go to the Files or Clients tab (depending on your version).
- Ensure the “Private key” option is activated; otherwise, you won’t be able to select the client type.
- Create a new client configuration.
- Ensure the Dynamic Configuration (or link to a centralized profile) option is active.
- As you install this client on machines, it will link to that profile in the cloud. Any future changes you make in the web profile will replicate to the installed agents.
- Important: A static client cannot be converted to dynamic. If you’ve already deployed a static one, you must reinstall AnyDesk using the previously generated dynamic client.
3. The Namespace Add-on
In AnyDesk, all public users have the alias name@ad. The Namespace allows you to have your own suffix, e.g., name@yourcompany.
Why is It the Ultimate Tool Against Spoofing?
1. Identity Verification (Anti-Spoofing)
No one in the world can create an alias ending in @yourcompany except for you (the license administrator). AnyDesk verifies domain/name ownership.
- Attack Scenario: A hacker calls claiming to be from “IT Support.” Their ID will be hacker@ad or a number like 332-112-445.
- Defense: If your ACL is set as *@yourcompany, the hacker’s connection automatically gets rejected. The employee’s PC doesn’t even get an alert.
2. Scalable Management
Without Namespace, every time a new technician joins, you must update the ACL for 500 employees to add the new technician’s ID.
With Namespace:
- Create the new technician’s alias in your console (new.tech@yourcompany).
- Since the ACL of the employees states *@yourcompany, the new technician gains immediate access without touching user configurations.
3. Forensic Auditing
In the connection logs (my.anydesk.com > Sessions), you will clearly see juan@yourcompany connected to recepcion@yourcompany. It’s much easier to audit than seeing ID 445212 connected to ID 998212.
Cost and Implementation
The Namespace is an add-on (additional cost) above the Standard or Advanced license, though it may sometimes be included in Enterprise licenses. It is purchased only once per name.
Summary of Proposed Architecture
For fortress-like security:
- Acquire Namespace: Purchase @yourcompany.
- Assign Aliases: Give each technician their corporate alias (technician1@yourcompany).
- Create Dynamic Custom Client:
- Corporate logo.
- User settings disabled.
- Linked to dynamic profile in the cloud.
- Centralized ACL: *@yourcompany.
- Deployment: Install this MSI via GPO (Group Policy) or MDM (Intune/ManageEngine) on all machines.
- Outcome: Only technicians with the @yourcompany alias can initiate a connection. The rest of the internet is blocked, and you can revoke access in seconds from the web console.
Additional Notes on Implementation
-
Deploy via GPO (Group Policies):
Once you download the .msi file of your custom client, you don’t need to go PC by PC. You can use a silent installation command in your Active Directory or management tool:
AnyDesk_Custom_Client.msi /qnSince it’s a custom client with the “embedded” configuration, you don’t need additional scripts to set the password or ACL; the MSI already contains that.
-
If you don’t purchase the Namespace:
You can still apply the strategy, but the ACL of the custom client will need to be a static list of IDs:
111222333, 444555666, 777888999
The operational risk is significant: if technician 111222333 leaves and takes their laptop, you’ll need to urgently update the clients of the employees to revoke their access (unless you use Dynamic Clients to update the list remotely). -
Technician’s Physical Security:
Remember that with this configuration, the “master key” is the laptops of your technicians. Ensure your technicians have:- Two-Factor Authentication (2FA) enabled for their AnyDesk access.
- A strong password on their Windows session.
Haz clic para continuar leyendo
- Published at